Showing posts with label Tips And Tricks. Show all posts

Thursday, 6 November 2014

Start Making Money In Your Home With Shorten Links On Adf.ly

Do you get less salary in your office and you need extra money for your needs ? don’t worry, because my post today will answer the problem and give you the right solution.
Now you can do part-time job in your home, to earn extra money easily. You just need a computer / laptop and internet connection to earn extra money in your home. how do i do it ? yeah with adf.ly, what is adf.ly ?
0
adf.ly is a site which allows you to shorten your URL, it is no different from bit.ly and tinyurl.com. However it does differ because they have ad twist. When ever someone opens the short url there is a 5 second frame which shows an ad. The timing is very short and thus majority of the people using this service don’t mind the wait in return for using the system.
Benefits
Traffic is targeted by country
It is very cheap: 4$-8$ per 1000 unique views (see detailed payout rates here)
Despite the low prices there is some conversion
How much money can I make?
The average rate of pay is $4.00 per thousand clicks. $4.00 may sound small, but just think for a second. How many people use Facebook? Over 500 million people use Facebook on a daily basis. If you could get even a small portion of Facebook users to click on your links, you could be earning a tidy amount of money. A great way to attract lots of users to click on your links is to set up a Facebook group. Many of these groups have more than a million users - so if you get your thinking cap on, you can make good money very quickly!!!. You can also make more money by making videos and post them to Youtube and leave a link in the description.
How to Register or Sign Up on adf.ly ?
  1. Click Here to go to the registration page of adf.ly 

  2. Then click the join now button

  3. Then fill in the registration form and click the Join Button.


  4. Now open the email inbox of your email provider service that you used to sign up to get a link or code to activate your adf.ly account.


  5. Now, you're ready to earn some money by shrinking your URLs and share it to the peoples on the world.

How to Get Traffic For your Links ?
Now the question is that how we can get traffic for our links and get more money. So for this there a lot of tips and tricks to get traffic to your links which are given below:
  1. Facebook.comMillions of people use Facebook everyday, so Facebook is the best way to post your links and publish them.
  2. Twitter.com
    Get some followers on twitter and post your links there so your followers can click on these links.
  3. Youtube.com
    You can also use Youtube.com for your links by uploading videos.
  4. Pinterest.com
    Publish pictures of popular content with links of youw website.
  5. Make a Website
    You can make a free website (blog or free google site) and post your links on the website with your content.
  6. Ask your Friends
    Ask your friends to follow the links on your website.
  7. Use Forums
    Write posts or comments on forums to promote your links and website.

OK, I will end my post today, Thank you for visiting my blog. I hope my posting today is useful to you, see you next time And happy making extra money in your home

Avast Free Antivirus! 2014 serial key valid till 2095


avast_free_antivirus_logo
Avast 9 – 2014
If you haven’t heard of AVAST, we’re only the most trusted name in antivirus, actively protecting more than 200 million PCs, Macs and Androids. So many people trust us because we’ve been protecting devices and data for 25 years, in over 40 languages (more than any other antivirus solution), on every populated continent in the world.
And now we got the keys too

How to Activate ?

    Disable from the internet
    Install AVAST!
    goto settings registration then offline registration
    copy the serial then paste in avast
    thats it!

serial key! :

http://www.4shared.com/office/g5n--cUKce/imtiaz_avast_keys_2014.html

                   C59249769E9900N1595-ENS7ULJH

Wednesday, 19 March 2014

Make a Free USA verified Paypal Account

Make a Free USA verified Paypal Account

Make+Free+USA+Verified+Paypal+account 

 How to make a Free verified USA Paypal Account?
Today i am gona teach you how to make a USA verified Paypal account in just some simple steps. All you need to do just to follow my steps and it's 100% Free and legit . Now you dont need to buy any VCC or VBA to make your paypal account verified . Following steps will described to you how to make your paypal account a USA verified Paypal account.

Step1 : Apply For a Payoneer Debit Card.
TO make your Paypal account a verified USA paypal account you need a USA Bank account Details . How you will get your USA Bank account details ? It's really easy and ofcourse it's 100% free. When you will apply for a Payoneer Debit card then they will provide you a free USA Bank account along with your Free Payoneer Master Debit card . For applying a Free Payoneer Debit card click on the following Link,

www.payoneer.com/‎ 

signup+for+Payoneer+card  

Important:- For Applying a Payoneer Master Debit card you have needed a National identity card SCAN copy or Driving license Number or a Passport . If you have one then you can apply for a Payoneer Master Debit card . Once your card is approved they will send you an email with your USA bank account Details and also they will delivered you your Free Payoneer Master Debit card at your home .

Step2:-  How to Use your Payoneer USA Bank account Details to make your Paypal account Verified. 
As i have described above when your card will be approved then the Payoneer company will send you an email with your Bank account details . That email has your Bank account details as your Account number and the Routing Number.You can also view your Bank account details by login into your Payoneer account and then click on receive Money and then click on USA payment services.


 Step3:-  Signup for a NEW USA Paypal account.
After getting your USA Bank account Details now the Next step is to Make a USA Paypal account if you dont have one yet . Important Thing is when you will signup for a NEW paypal account at Paypal official site then this time you have to select the country as USA otherwise you wont make your Paypal account verified.

Step4:- How to add your USA Bank account details in your NEW Paypal account. 
In step4 i will teach you how to add your USA bank account details into your Paypal account to make it verified. and it's really simple. All you need to do now login into your Paypal account and click on profile and then click on add Bank or update Bank account. Then you have to add your USA bank account details there that Payoneer has sent you in your email.


Final Step:- You have a Verifed Paypal account now :) 
In this step you need a little bit patience . once you have added your USA bank account details into your paypal account then Paypal will send you two small verification transactions into your payoneer account transaction History or in your email inbox .

Payoneer+account+Transaction+History 

Remember it that it will take 1 or 2 days to appeared those 2 transactions into your Payoneer account . so check your Payoneer account or your mails inbox after 1 or 2 days . If you found those small transaction then again login to your paypal account and then again click on profile and then click on Add BANK account or update Bank account . This time paypal will ask to you add those 2 small transactions amounts there and click on continue . Now your Paypal will get verified instantly .Cheers :)
 

Get+Free+verified+Paypal+account


How Put Image in Folder Background

How Put Image in Folder Background

Put Image in Folder Background

Step  Open notepad (windows key + R type in notepad)

Step  Copy and paste the following line in your notepad.

[ExtshellFolderViews]

 
{BE098140-A513-11D0-A3A4-00C04FD706EC}={BE098140-A513-11D0-A­3A4-00C04FD706EC} 

[{BE098140-A513-11D0-A3A4-00C04FD706EC}]

IconArea_Image=C:\background.jpg

Note: C:\Background.jpg will be shown as your background image. You can Change it to your current background image path. The picture must fit your screen resolution. (its an example) can use any picture

Step Now save the file as “desktop.ini".

Step  Now copy-paste the file to any folder where you want to show the background picture.

Step wooolllllaaaaa done..!! Refresh to see the changes.

ALL USEFUL KEYBORD SHORTCUT KEYS FOR COMPUTER LAPTOPS

ALL USEFUL KEYBORD SHORTCUT KEYS FOR COMPUTER LAPTOPS 

All Useful Keyboard Shortcut Of computer ,laptop user


Hi Guys I got Suggestion to update my blog with all keyboard shortcut from my friend Khawaja Attiq So I Updated It.Getting familiar with keyboard shortcuts not only help you get the work done faster, but also more efficient. If your daily job rely heavily on using Windows, here are some 100+ Windows Keyboard Shortcuts you might want to check out. I Give Us suggestion An We will Try To Update That Content.

Shortcut is here See All

Usefull some really general shortcuts that you often used Daily.
CTRL+C (Copy)
CTRL+X (Cut)
CTRL+V (Paste)
CTRL+Z (Undo)
Delete (Delete)
Shift+Delete (Delete the selected item permanently without placing the item in the Recycle Bin)
CTRL while dragging an item (Copy the selected item)
CTRL+Shift while dragging an item (Create a shortcut to the selected item)
F2 key (Rename the selected item)
CTRL+RIGHT ARROW (Move the insertion point to the beginning of the next word)
CTRL+LEFT ARROW (Move the insertion point to the beginning of the previous word)
CTRL+DOWN ARROW (Move the insertion point to the beginning of the next paragraph)
CTRL+UP ARROW (Move the insertion point to the beginning of the previous paragraph)
CTRL+Shift with any of the arrow keys (Highlight a block of text)
CTRL+A (Select all)
F3 key (Search for a file or a folder)
Alt+Enter (View the properties for the selected item)
Alt+F4 (Close the active item, or quit the active program)
Alt+Enter (Display the properties of the selected object)
Alt+Space bar (Open the shortcut menu for the active window)
Alt+Tab (Switch between the open items)
Alt+Esc (Cycle through items in the order that they had been opened)
F6 key (Cycle through the screen elements in a window or on the desktop)
F4 key (Display the Address bar list in My Computer or Windows Explorer)
Shift+F10 (Display the shortcut menu for the selected item)
Alt+Spacebar (Display the System menu for the active window)
CTRL+esc (Display the Start menu)
Alt+Underlined letter in a menu name (Display the corresponding menu)
Underlined letter in a command name on an open menu (Perform the corresponding command)
F10 key (Activate the menu bar in the active program)
F5 key (Update the active window)
Backspace (View the folder one level up in My Computer or Windows Explorer)
ESC (Cancel the current task)
Shift when you insert a CD-ROM into the CD-ROM drive (Prevent the CD-ROM from automatically playing)

Remote Desktop Connection Navigation :)

Alt+PAGE UP (Switch between programs from left to right)
Alt+PAGE DOWN (Switch between programs from right to left)
Alt+INSERT (Cycle through the programs in most recently used order)
Alt+HOME (Display the Start menu)
CTRL+Alt+BREAK (Switch the client computer between a window and a full screen)
Alt+Delete (Display the Windows menu)
CTRL+Alt+- (Place a snapshot of the active window in the client on the Terminal server clipboard and provide the same functionality as pressing PRINT SCREEN on a local computer.)
CTRL+Alt++ (Place a snapshot of the entire client window area on the Terminal server clipboard and provide the same functionality as pressing Alt+PRINT SCREEN on a local computer.)

Internet Explorer Navigation...

CTRL+B (Open the Organize Favorites dialog box)
CTRL+E (Open the Search bar)
CTRL+F (Start the Find utility)
CTRL+H (Open the History bar)
CTRL+I (Open the Favorites bar)
CTRL+L (Open the Open dialog box)
CTRL+N (Start another instance of the browser with the same Web address)
CTRL+O (Open the Open dialog box, the same as CTRL+L)
CTRL+P (Open the Print dialog box)
CTRL+R (Update the current Web page)
CTRL+W (Close the current window)
I hope It is useful for u....
Enjoy !

Wednesday, 12 March 2014

how to embed flash files in blogger?

If you want to embed flash in a particular page only -
then follow the below steps:


  • log in your blogger account
  • go to dashboard
  • make a new post
  • after writing your post simply at the end switch on from compose mode to HTML mode .


then anywhere in the post  use the code,where you feels like to embed  flash object ,between <br />      <br /> tag.

code:

<embed type="application/x-shockwave-flash" src="http://Paste the link here(delete extra code after.swf)" pluginspage=" http://www.macromedia.com/go/getflashplayer" height="101" width="400"></embed>

You can edit the code and adjust the height and width.
You can also change the quality of the flash animation quality=low/high/ accordingly.
In the above code where it says paste the URL of the file uploaded means that you have to upload the flash file to some file hosting site.You can skip the  method stated below  if you are already having the link,simply use it.
how to upload the swf file:
 Unfortunately Blogger does not allow us to upload swf files but we can upload files to google sites and get the links after uploading.


  • open : sites.google.com
  • sign in using your Google account
  • choose any template and provide a unique website name(any name )
  • now go to more / manage site /attachments and upload the .swf file


  • After uploading... right click on download link and "copy link address "
  • and past the URL in the above code.

note: make sure to delete some redirect code after .swf in the copied link address to make it work and 

Then save and switch back to compose mode in blogger ,publish your blog.
 Visit your blog and enjoy the flash object embedded.
If you are unable to see the flash file after visiting your blog then make sure that you are having flash player ADD-ON enabled on your browser.

how to remove navbar in blogger


Disable navbar from your blog

Many publishers wants to hide the navbar in blogger because it looks more professional without it. Quick easy and simple way to remove the navbar from your blogger blog. No need to edit HTML of configure any script. log in your blogger account then see the steps required.
steps required.


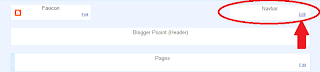
  • go to dashboard
  • click layout


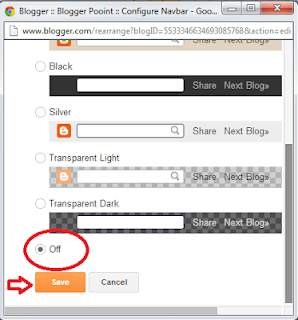
  • click on edit navbar option


  • select off and then save.

Disable right click in blogger

Protect your blogs:

This tweaks helps bloggers to disable right click on the blog.
make your content copyrighted in the sense that it disables right click .
This can save you contend and hard work from directly being copied.
This is an awesome tool, just add few codes
in HTML widget and enjoy!

here is the code:


<script language=javascript>
<!--

//Disable right mouse click Script
var message="copyrighted";

///////////////////////////////////
function clickIE4(){
if (event.button==2){
alert(message);
return false;
}
}

function clickNS4(e){
if (document.layers||document.getElementById&&!document.all){
if (e.which==2||e.which==3){
alert(message);
return false;
}
}
}

if (document.layers){
document.captureEvents(Event.MOUSEDOWN);
document.onmousedown=clickNS4;
}
else if (document.all&&!document.getElementById){
document.onmousedown=clickIE4;
}

document.oncontextmenu=new Function("alert(message);return false")

// -->
</script> 

you can also change the messageyou want to displayed when right click is pressed 
on your blog. just make a change where copyrighted is written to your own message 
to be displayed:

//Disable right mouse click Script
var message="copyrighted"; 


Thursday, 21 March 2013

How to Download uTorrent File With IDM


How to Download uTorrent File With IDM


Now You Can Download Torrent File Without utorrent Or Bittorrent Just You have NeedTorrent File And Idm.
Internet Download Manager Faster Then Other Softwares.
The Speed Of IDM Doesn't Depend On leeches or seeds,Etc.
It Depend On Your Net Connection.
Just Follow These Instructions.


1.)Internet Download Manager Install if you have not download from here .Download 
2.)Download Any torrent File.......
3.)Open This site...http://zbigz.com/.
3.Upload Torrent File Then Press Go..
4.Now Go To Free User And Register Free.
5.Wait Few seconds then he show download link.
Download And Enjoy..Don't Forgot Leave Your Comments.

Thursday, 14 March 2013

Remove Autorun virus

How to Remove Autorun virus from Hard Disk


Hy My Name is SOHAIL and today i will tell you how to Remove Autorun Virus from your Computer Hard Disk.
So Follow Me Setup by Setup.


METHOD 1. 
  1. First of all click on start Button and open Run.Type in Run "CMD" press Enter. 
  2. Type "cd\" and press enter to get to the root directory of c:\.
  3. Type "attrib -h -r -s autorun.inf" and press enter.
  4. Type "del autorun.inf" and press enter.
  5. Repeat the same process with other drives, type "d:" and do the same thing. then next "e:".and restart your computer.
  6. Restart your computer and it's done. Enjoy the freedom to open hard drives on a double click.
METHOD 2.

  1. Go to any folder.In that on the top menu go to Tools--> Folder Options, which will be beside File, Edit, View, Favourites.
  2. A window pops up after you click on folder options.In that window go to View tab and select the option Show hidden files and folders.Now uncheck the option Hide protected Operating system files.Click Ok
  3. Now Open your drives (By right click and select Explore. Don't double click!) Delete autorun.inf and MS32DLL.dll.vbs or MS32DLL.dll (use Shift+Delete as it deletes files forever.) in all drives include Handy Drive and Floppy disk.
  4. Open folder C:\WINDOWS to delete MS32DLL.dll.vbs or MS32DLL.dll (Use Shift+Delete )
  5. Go to start --> Run --> Regedit and the Registry editor will open
  6. Now navigate in the left pane as follows: HKEY_LOCAL_MACHINE --> Software --> Microsoft --> Windows --> Current Version --> Run .Now delete the entry MS32DLL (Use Delete key on keyboard)
  7. Go to HKEY_CURRENT_USER --> Software --> Microsoft --> Internet Explorer --> Main and delete the entry Window Title “Hacked by Godzilla”
  8. Now open the group policy editor by typing gpedit.msc in Start --> run and pressing enter.
  9. Go to User Configuration --> Administrative Templates --> System . Double Click on entry Turn Off Autoplay then Turn Off Autoplay Properties will display.Do as follows:                             Select Enabled                                                                                                                             Select All drives                                                                                                                                 Click OK
  10. Go to startup tab in it and uncheck MS32DLL .Now click Ok and when the system configuration utility asks for restart ,click on exit without restart.
  11. Now go to Tools --> Folder Options on the top menu of some folder again and select the Do not show Hidden files and check Hide operating system files.
  12. Go to your recyclable bin and empty it to prevent any possiblity of MS322DLL.dll.vbs lying there.
  13. Now restart your PC once and you can now open your hard disk drives by double clicking on them
TIPS:

  • Sometimes "cmd prompt" returns an error "file not found autorun.inf, sometimes some of your hard drives might not be containing the autorun.inf file, so leave those drives and try the next ones.
WARNINGS:

  • After deleting the file from all of your hard drives, immediately restart your computer. Don't try to open your drives by double clicking before restarting the machine otherwise you'll have to repeat whole of the procedure again.


REMOVE BOOT SECTOR

How to Remove BOOT SECTOR Virus From Hard Disk


Hy Friends today i am going to show you how to REMOVE BOOT SECTOR From your HARD DISK.
So Follow me Setup by Setup.

Has your computer been acting strange lately? Has it been running slow, or telling you that your computer needs a certain program? If so it may have a virus. This article deals with ones called Boot Sector Viruses. These reside in the sectors that are used to start your Operating System. A
simple operating system replacement may leave the virus to continue its evil ways.

Follow These Setups:

  1. Remove any important files and shut down the infected computer. You can not begin to remove the virus if it is in the RAM in your computer.
  2. Option 1: Take the drive to a pro. UNPLUG the computer, and all monitors, etc. Remove the HDD (hard disk drive or hard drive) from the infected computer. Be sure to remove all of the static electricity from your self by touching the metal case.
  3. Option 2: use software on CD-rom or floppy (yes, can still download as floppy image) to scan the drive and fix the MBR. Start with the O.S. Install CD. Windows Recovery Console option if is Windows.
  4. To change the Boot Order: Enter BIOS via appropriate startup key for your computer. When the BIOS setup page shows, set the CD or Floppy drive to boot first.
  5. Sources of that software: Find out which company manufactures your HDD and see if they have a utility that will do a Low-Level format. This part is important because it deletes everything from your hard drive so that no one can get it back, including the virus. Some common HDD manufacturers' tools for doing this can be found here.
  6. Run the formatting utility provided by your HDD manufacturer.
  7. If have errors booting the O.S., reinstall your Operating System of choice however you want to.
  8. And the most important thing is that you use trusted software to remove the virus or else you will be in more trouble (if that software is infected). Some software will show many virus 'hits' in order to sell the full version, so read reviews first.
TIPS:

  • A bootable floppy is NOT required, just a formatted floppy. Check to see if your floppy is formatted for Mac or PC on the label. If required, in MS Windows, go to My Computer, right click on your floppy drive, click "Format...",etc. Then run the downloaded hard-drive floppy image installer. A CD image will require burning software.
  • If you feel uncomfortable completing any of the steps, take your computer in to a specialist.
WARNINGS:
  • Be sure to write protect the floppy after writing using the sliding tab, because any virus that is residing in the boot sector of your HDD may copy itself.
  • A Low-Level format will erase anything and everything on your HDD. It does this because it erases the whole disk, and not just the File Allocation Table (FAT) which is the directory for the hard drive. Its kind of like a telephone directory. When you delete things or do a format in Windows or DOS, known as a High-Level format, it tells the FAT that there is nothing there anymore, but leaves the data on the disk. A Low-Level format or delete tells the FAT that there is nothing there and then rewrites the sectors on the HDD where the file was. Because of this there is no possible way to get your data back after this process is complete.